Monday, May 30, 2011

Lemon Meringue Pie (Gluten-free)

I don't know why, but lemon meringue pie has always been my favourite. And any time I've had the craving, I've always resorted to the neon yellow instant pie version (confession: I've even purchased pre-made crusts - never again!) But this new discovery of homemade lemon meringue pie - from scratch! - has made it so that I may never be able to go back to instant again. This recipe is not for amateurs, but it is completely worth it if you have the time and patience. I will try to make it as easy as possible - in 3 steps. Let's do it!

What you'll need:

Crust (Gluten-free)
  • 1 cup white rice flour
  • 1/4 cup finely crushed almonds
  • 1/4 tsp baking powder
  • 1 tbsp white sugar
  • 1 tbsp brown sugar
  • pinch of salt
  • 1 large egg
  • 1/4 cup butter
Lemon filling
  • 1/2 can evaporated milk
  • 1/4 cup cornstarch
  • 1/4 cup sugar
  • pinch of salt
  • 2/3 cup boiling water
  • 2 egg yolks, beaten
  • juice of one lemon
  • grated rind of one lemon
Meringue
  • 4 egg whites
  • 1/2 cup of sugar
Preheat oven to 425 degrees.

STEP 1: Crust

In the interest of not making this post too long, click here to see how to make an excellent gluten-free pie crust from my previous Pumpkin Pie post.

STEP 2: Lemon filling

Whisk together the evaporated milk, sugar, salt and corn starch.
Stir in boiling water and boil over gentle heat. Watch as it magically thickens into a luscious custard (it will take about 5 minutes).
Prepare your eggs; put the two egg whites aside for later, and beat egg yolks.
Once you've achieved custard status, remove from heat and add the egg yolks. Cook and stir over low heat for 2 more minutes, but do not boil.
Prepare your lemon juice and rinds (this is something can be done before you start the stovetop work).
After the yolk is blended, add the lemon juice and rind and give it one final stir.
Allow filling to cool for 5 minutes, and then pour into your crust.
Put crust and filling in the fridge to cool for at least an hour.
STEP 3: Meringue (preheat oven to 350 degrees)

Oh meringue... Meringue is a beautiful thing, but it is not always easy to achieve. I have experienced some major meringue flops; here are a few general tips I have discovered to achieving meringuey perfection:
  • always use fresh eggs
  • make sure egg whites are at room temperature
  • stainless steel bowls work best (no plastic)
  • avoid making meringue on high humidity days
  • more is more: most recipes call for 2 egg whites - use 4 egg whites (you'll thank me later)
So to start, blend the 4 egg whites (2 from before, 2 new) on high until they become white and frothy.
Then, slowly start adding the 1/2 cup of white sugar, about a tablespoon at a time. As you blend, try to introduce air by raising and lowering the beaters, rotating the bowl as you do so.
The goal is to achieve firm, glossy peaks - it can take 5-10 minutes. Magic takes time.
And then, let the meringue pour onto your cooled filling.
Um, yum.
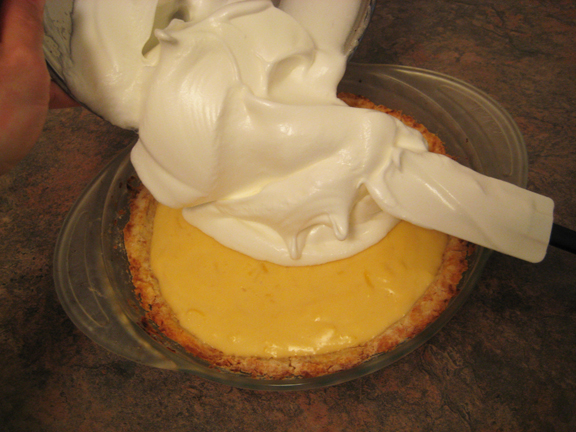
Spread the meringue right to the edge of the crust with a spatula (this is key to sealing the pie), but try do it in as few strokes as possible (meringue tends to deflate the more it is touched). Then, place the pie in your preheated oven and back for about 10 minutes, or until the peaks become golden brown.
Ta-dah!
And here is our finished lemon meringue pie. Serve with lemon balm tea on a warm summer evening and enjoy!

Monday, November 15, 2010

Chicken Biryani

Biryani is a Middle-eastern dish that originated in Persia, but has many regional variations. One of our favourites is Iranian-style chicken biryani, often garnished with fruit (cooking dates, raisins, or pomegranates) and roasted nuts (cashews are great). You also have an excuse to use saffron, the world's most expensive spice (by weight). You only live once, right?

What you'll need:
2 cups cooked basmati rice (leftover is even better!)
1 onion, chopped
2 cloves garlic, minced
1 inch ginger, minced
1 green chili, chopped (optional if you want to tone down the heat)
3 tomatoes, thinly sliced
1 medium zucchini, thinly sliced
1 red pepper, thinly sliced
4-6 chicken breasts, cubed
3 tbsp curry paste
1/4 tsp salt
1/4 tsp garam masala
1/2 tsp turmeric
3 bay leaves
6 cardamom pods
6 cloves
a few strands of saffron (optional)

Preheat oven to 375 F.
As usual, prep all your ingredients in advance for easy access.
Saute your onions for about 5 minutes in olive oil.
Have your garlic, ginger and chilies ready, and...
...add them to the onions, frying for about 2 minutes.
Take your chicken pieces...
...and add them to the pot. Let the flavours marry for about 5 minutes.
Next, add your salt, garam masala,
curry paste,
and stir well. Cook for another 5 minutes.
At this point, your kitchen should start to smell delicious.
Now, add your remaining vegetables...
...give it a good stir, and let this simmer for 5-10 minutes (until the tomates begin to soften and fall apart).
Now it's time to prep your rice. Take a large casserole dish or pan, and lay out your rice.

Add the tumeric,
bay leaves, cloves,
and saffron (if you have it).
Give it a good stir until the turmeric begins to stain the rice yellow.
Now, carefully pour the chicken and vegetables into you dish.
Stir in with the rice until everything is evenly distributed.
Place in the oven for 30-40 minutes, stirring occasionally.
You'll know it is ready when everything when moist of the moisture evaporates and it starts to turn golden.

Garnish with dried fruit and nuts (I suggest chopped dates and cast iron pan-roasted cashews), and serve with chutney and yogurt or tzatziki. Prepare to be transported to a foreign land with this extravaganza of exotic flavours. Delicious!

Monday, October 25, 2010

Butternut Squash Soup

Another fall favourite around here is butternut squash soup. I picked up this giant squash at the St. Lawrence farmer's market last Saturday for $3.00 - makes enough soup to feed a small army. And it's so deliciously buttery and velvety, it nearly passes as a dessert.
What you'll need:
  • 1 giant butternut squash (or, 2 medium sized ones)
  • 1 onion, minced
  • 4 cloves garlic, minced
  • 2 cups chicken or vegetable broth
  • 1/2 uncooked rice (optional)
  • 1/2 tsp allspice
  • 1 tbsp brown sugar
  • salt to taste
First, you need to get all that squashy goodness out. Some people like cutting and peeling their squash - I am not one of those people. Instead, I opt to cut the squash into 2 inch sections and steam in the oven until the skin become golden and peels off. Just make sure you add water to the bottom of the pan, and replenish it as the squash gets steamed.
This is how they should look after about 40 minutes at 400 degrees - soft and golden. *Note: squash retains heat like crazy, so set aside and let cool for at least 10 minutes before you attempt the next step.
Now the messy part - peel off all the skin and scrap the delicious squash mush into a bowl.
Next, prep your onions and garlic,
and sauté in olive oil (or butter) for a couple minutes.
Add the squash mush and marry it with the onion/garlic mixture.
Add your broth and stir.
If you like your soup really thick, add 1/2 of rice.
Then add your brown sugar, allspice and salt. Stir well and simmer for at least 20 minutes.
Now it's blending time. Prep your blending station something like this.
Add small batches to the food processor...
And blend!
You should end up with a huge pot of thick deliciousness. Stir well and warm at a low heat until you're ready to eat.

If you want to be extra fancy, roast the butternut squash seeds while you're oven is still hot, and use them to garnish your soup.
This soup is a guaranteed people pleaser, and if you have extra, freeze solo batches and enjoy on a cold winter day.